Slides
There are several ways of playing what might, at first glance, seem to be a simple effect. The way you write slides into your tablature can make a world of difference in the quality of reproduction you achieve.
|
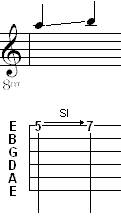
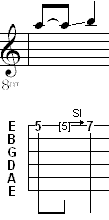
The default is a simple slide (glissando) where the first note is picked and then continues to sound as you move up or down towards the destination fret. To enter a slide, insert the first note and then press [S] to assign the "slide" effect to it. You can also select the effect from the Special Effects palette. Now press [Tab] to advance the cursor to the next position and enter the second note. The arrow indicating a slide will automatically appear. |
TablEdit allows you to enter slides without precise destinations or origins (slide to nowhere or slide from nowhere). In order to accomplish this, select the desired note(s), apply a normal slide effect and press [>] or [<].
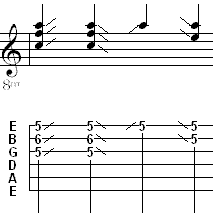
Another common playing technique is the slide-pick, where a note is picked, a slide takes place and the destination note is plucked on arrival. The first step is create a simple slide as explained above and then highlight the ending note. Finally, click on one of the pick stroke indicators on the lower left of the "Hand" palette or select "Thumb" or "Other Finger" from the Pick strokes & Fingerings dialog. This will place a pick stroke indicator (a vertical line) to the right of the note.
|
|
|
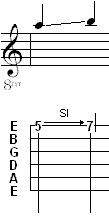
A timed slide can be created to select the exact point within the duration of an extended note to begin the slide. The normal behavior in TablEdit is for a slide to begin immediately after the note is picked. For example, a slide starting on a 1/4 note from fret 5 to fret 7 will result in 3 tones spread equally over the duration of the note. To create a timed slide, split the original note into shorter note durations using tied notes in such a way that the last tied note is located at the point from which you want the slide to begin and apply the slide effect to the tied note. Using the slide from the previous examples, to start the slide on the second half of the beat, enter two eighth notes on the fifth fret, tie the second note to the first and apply the slide effect to the second (tied) eighth note. Then advance the cursor to the next position, select the duration (in this case a 1/4 note) of the destination note and enter it. |
The last type of slide is the grace note slide. The first step consists of selecting the destination note. Then from the Grace Note dialog box, you check the "Slide" box and you specify the starting fret. The grace note will appear in the tablature, as a smaller fret number followed by a slash. The small fret number represents the starting point of the slide. In notation, a grace note is inserted.